

Simplify Your C# Code with these straightforward tips to enhance readability, improve performance, and make your programming life significantly easier.
Tired of messy C# code that’s hard to maintain?
Feeling overwhelmed by the complexity in your projects?
Simplify your C# code effortlessly with these proven techniques.
Here are some tips to simplify your C# code:
1. Use Meaningful Names
Choose descriptive names for variables, methods, classes, etc. This makes your code more readable and self-documenting.
Follow standard naming conventions (e.g., PascalCase for classes, camelCase for variables).
Let’s improve code readability by using meaningful names and adhering to naming conventions. I’ll show a before and after example to illustrate the concept.
Before:
// Example of code with non-descriptive names and inconsistent naming conventions.
class program
{
public static void DoWork(int d1, int d2)
{
int r = d1 + d2;
Console.WriteLine(r);
}
}
In this example:
- The class name
programis not descriptive and doesn’t follow the PascalCase convention. - The method
DoWorkis somewhat descriptive but could be more specific. - The parameters
d1andd2are unclear. - The variable
rdoes not convey its purpose.
After:
// Improved example with descriptive names and consistent naming conventions.
class Calculator
{
public static void AddAndDisplayResult(int addend1, int addend2)
{
int sum = addend1 + addend2;
Console.WriteLine(sum);
}
}
Improvements made:
- Renamed
programtoCalculator, which is more descriptive and follows PascalCase, indicating it’s a class. - Changed
DoWorktoAddAndDisplayResult, clearly stating the method’s purpose. - Replaced
d1andd2withaddend1andaddend2, which are more meaningful. - Used
suminstead ofrfor the result variable, directly reflecting its role in the operation.
These changes make the code more readable and understandable by simply glancing at it, demonstrating the importance of meaningful names and proper naming conventions.

2. Avoid Redundant Code
Don’t repeat the same logic in multiple places. Extract it into a separate method or class.
Use built-in methods and libraries when possible instead of reinventing the wheel.
Let’s address code redundancy by refactoring repetitive logic into separate methods and leveraging built-in functionalities. This approach enhances code maintainability and readability.
Before:
// Example with redundant code and manual implementations.
class ReportGenerator
{
public void GenerateReport(DateTime startDate, DateTime endDate)
{
TimeSpan duration = endDate - startDate;
int days = duration.Days;
Console.WriteLine("Report Duration: " + days + " days");

// Repeat the same logic elsewhere in the code.
DateTime projectStartDate = new DateTime(2023, 1, 1);
DateTime projectEndDate = DateTime.Now;
TimeSpan projectDuration = projectEndDate - projectStartDate;
int projectDays = projectDuration.Days;
Console.WriteLine("Project Duration: " + projectDays + " days");
}
}
This code snippet calculates the duration between two dates in days, a task that’s repeated twice, creating unnecessary redundancy.
After:
// Refactored code with extracted method and utilization of built-in functionalities.
class ReportGenerator
{
public void GenerateReport(DateTime startDate, DateTime endDate)
{
Console.WriteLine("Report Duration: " + CalculateDurationInDays(startDate, endDate) + " days");

// Use the extracted method elsewhere in the code.
DateTime projectStartDate = new DateTime(2023, 1, 1);
DateTime projectEndDate = DateTime.Now;
Console.WriteLine("Project Duration: " + CalculateDurationInDays(projectStartDate, projectEndDate) + " days");
}

private int CalculateDurationInDays(DateTime start, DateTime end)
{
return (end - start).Days;
}
}
Improvements made:
- Extracted the logic for calculating the duration in days into a separate method,
CalculateDurationInDays, reducing redundancy. - Utilized built-in
TimeSpanproperties directly in a concise manner. - Maintained consistency and clarity in how durations are calculated and displayed.
By extracting repeated logic into a dedicated method, we’ve made the code cleaner, easier to understand, and maintain. Additionally, it demonstrates a practical use of built-in .NET functionalities to avoid “reinventing the wheel.”
3. Break Down Complex Logic
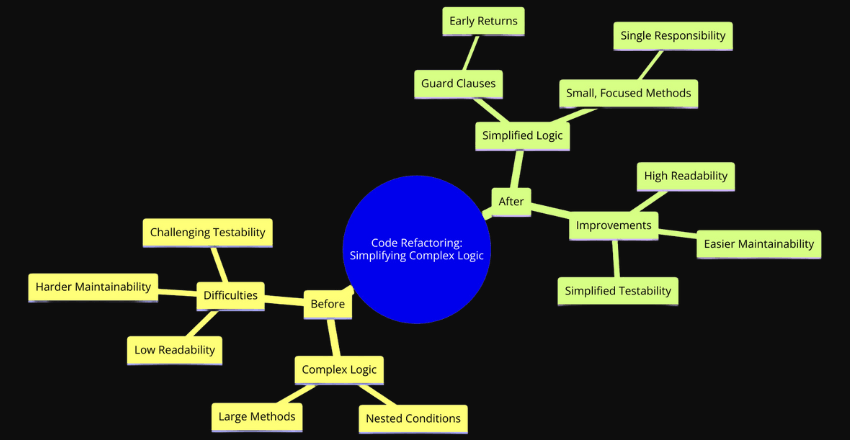
Split large methods into smaller, more focused ones with a single responsibility.
Use guard clauses (early returns) to simplify conditional logic.
Breaking down complex logic into smaller, more manageable pieces enhances code readability, maintainability, and testability. By using guard clauses, we can further simplify the flow and make the code more straightforward.
Before:
// Example of a method with complex logic that needs simplification.
class UserManager
{
public void ProcessUser(int userId, string action)
{
if (userId > 0)
{
User user = GetUserFromDatabase(userId);
if (user != null)
{
if (action == "Activate")
{
if (!user.IsActive)
{
user.IsActive = true;
SaveUser(user);
Console.WriteLine("User activated.");
}
}
else if (action == "Deactivate")
{
if (user.IsActive)
{
user.IsActive = false;
SaveUser(user);
Console.WriteLine("User deactivated.");
}
}
// Potentially more actions here...
}
}
}

private User GetUserFromDatabase(int userId) { /* ... */ return new User(); }
private void SaveUser(User user) { /* ... */ }
}

class User
{
public bool IsActive { get; set; }
// Other properties...
}
After:
// Refactored code with simplified logic, guard clauses, and more focused methods.
class UserManager
{
public void ProcessUser(int userId, string action)
{
if (userId <= 0) return;

User user = GetUserFromDatabase(userId);
if (user == null) return;

switch (action)
{
case "Activate":
ActivateUser(user);
break;
case "Deactivate":
DeactivateUser(user);
break;
// Potentially more actions handled in a similar manner...
}
}

private void ActivateUser(User user)
{
if (user.IsActive) return;

user.IsActive = true;
SaveUser(user);
Console.WriteLine("User activated.");
}

private void DeactivateUser(User user)
{
if (!user.IsActive) return;

user.IsActive = false;
SaveUser(user);
Console.WriteLine("User deactivated.");
}

private User GetUserFromDatabase(int userId) { /* ... */ return new User(); }
private void SaveUser(User user) { /* ... */ }
}

class User
{
public bool IsActive { get; set; }
// Other properties...
}
Improvements made:
- Introduced guard clauses for
userIdandusernull checks, reducing nesting and making the method’s main logic more prominent. - Split the complex
ProcessUsermethod by extractingActivateUserandDeactivateUsermethods, adhering to the Single Responsibility Principle. - Used a
switchstatement to handle different actions, making the code cleaner and more extensible for future actions.
These changes make the code easier to follow, test, and modify, showcasing the benefits of simplifying complex logic and organizing code into focused methods.
4. Leverage Language Features
Use LINQ for querying and transforming data collections.
Employ lambda expressions and anonymous methods for concise code.
Utilize auto-implemented properties when appropriate.
Embracing the features offered by a programming language can dramatically enhance code clarity, efficiency, and brevity. In C#, LINQ (Language Integrated Query), lambda expressions, anonymous methods, and auto-implemented properties are powerful tools for working with data collections, writing concise code, and simplifying property definitions.
Before:
// Example without leveraging C# language features effectively.
class ProductManager
{
private List<Product> _products;

public ProductManager(List<Product> products)
{
_products = products;
}

public List<Product> GetActiveProducts()
{
List<Product> activeProducts = new List<Product>();
foreach (Product product in _products)
{
if (product.IsActive)
{
activeProducts.Add(product);
}
}
return activeProducts;
}

public Product FindProductById(int id)
{
foreach (Product product in _products)
{
if (product.Id == id)
{
return product;
}
}
return null;
}
}

class Product
{
private int _id;
public int Id
{
get { return _id; }
set { _id = value; }
}

private bool _isActive;
public bool IsActive
{
get { return _isActive; }
set { _isActive = value; }
}

// Other properties...
}
After:
// Improved code that leverages C# language features for efficiency and simplicity.
class ProductManager
{
private List<Product> _products;

public ProductManager(List<Product> products)
{
_products = products;
}

public IEnumerable<Product> GetActiveProducts()
{
// Using LINQ to filter active products.
return _products.Where(product => product.IsActive);
}

public Product FindProductById(int id)
{
// Using LINQ's SingleOrDefault for concise searching.
return _products.SingleOrDefault(product => product.Id == id);
}
}

class Product
{
// Using auto-implemented properties for simplicity.
public int Id { get; set; }
public bool IsActive { get; set; }
// Other properties...
}
Improvements made:
- In
GetActiveProducts, LINQ’sWheremethod replaces the verboseforeachloop, making the code more readable and concise. - For
FindProductById, LINQ’sSingleOrDefaultmethod provides a more elegant way to search for a product by ID, replacing anotherforeachloop. - The
Productclass now uses auto-implemented properties forIdandIsActive, reducing boilerplate code and enhancing readability.
By leveraging these language features, the code becomes not only shorter but also more expressive, showcasing how modern C# features can be used to write cleaner, more maintainable code.
5. Follow Coding Conventions
Adhere to a consistent coding style (e.g., Microsoft’s C# Coding Conventions).
Use consistent formatting and indentation for better readability.
Adhering to coding conventions is crucial for maintaining consistency, enhancing readability, and ensuring that code is accessible to all team members. Let’s examine a before-and-after scenario that illustrates the importance of following a consistent coding style, specifically aligning with Microsoft’s C# Coding Conventions, which recommend using camelCase for local variables and method parameters, and PascalCase for method names. It also emphasizes the importance of consistent formatting and indentation.
Before:
// Example with inconsistent coding style and poor formatting.
public class customerManager
{
public void addCustomer(string FirstName, string lastName)
{
int Age; Console.WriteLine("Adding customer");
//Code to add customer
}
public void Deletecustomer(int CustomerId)
{Console.WriteLine("Deleting customer");
//Code to delete customer
}
}
In this snippet:
- The class and method names do not follow PascalCase convention.
- The parameters and local variables do not follow camelCase convention.
- The formatting and indentation are inconsistent and messy.
After:
// Improved code adhering to C# coding conventions with consistent formatting.
public class CustomerManager
{
public void AddCustomer(string firstName, string lastName)
{
Console.WriteLine("Adding customer");
// Code to add customer
}

public void DeleteCustomer(int customerId)
{
Console.WriteLine("Deleting customer");
// Code to delete customer
}
}
Improvements made:
- The class name
customerManageris updated toCustomerManager, and method names are corrected toAddCustomerandDeleteCustomer, following the PascalCase convention. - Parameters
FirstName,lastName, andCustomerIdare nowfirstName,lastName, andcustomerId, adhering to camelCase convention. - Consistent formatting and indentation are applied, making the code more organized and readable.
By aligning with recognized coding conventions and ensuring consistent formatting, the code not only looks professional but becomes easier for any developer to read, understand, and maintain. This standardization is especially beneficial in collaborative environments, facilitating smoother code reviews and integrations.
6. Write Self-Documenting Code
Choose expressive names and follow standard naming conventions.
Add XML documentation comments for public members.
Write clear and concise comments when necessary, but avoid redundant or obvious ones.
Writing self-documenting code means your code is clear and understandable without needing excessive comments. This approach focuses on choosing expressive names that convey purpose and behavior, adhering to naming conventions for easy reading, and judiciously using comments to explain “why” something is done, rather than “what” is being done, which should be evident from the code itself.
Before:
// Example with non-descriptive names and excessive comments.
public class ProcessData
{
// Process data
public void Process(int d) // d is data
{
// Check if d > 10
if (d > 10)
{
Console.WriteLine(d);
}
}
}
Issues in this snippet:
- The class and method names (
ProcessDataandProcess) are vague. - The parameter
dis unclear. - Comments are redundant, stating the obvious rather than providing useful insight.
After:
/// <summary>
/// Manages user transactions.
/// </summary>
public class TransactionManager
{
/// <summary>
/// Prints the transaction ID if it exceeds the minimum threshold.
/// </summary>
/// <param name="transactionId">The unique identifier for a transaction.</param>
public void PrintTransactionIdIfAboveThreshold(int transactionId)
{
const int threshold = 10;
if (transactionId > threshold)
{
Console.WriteLine(transactionId);
}
}
}
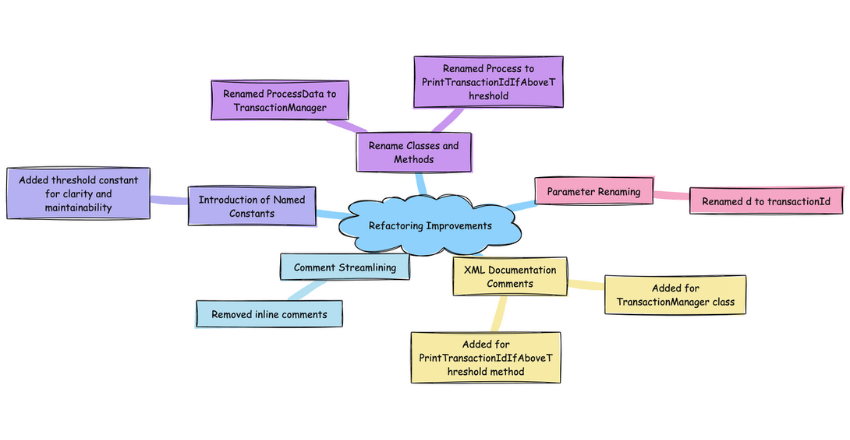
Improvements made:
- Renamed
ProcessDatatoTransactionManagerandProcesstoPrintTransactionIdIfAboveThresholdfor clarity. - The parameter
dis nowtransactionId, clearly indicating its purpose. - Introduced XML documentation comments for the class and method, offering useful information at a glance for other developers or for generating documentation. The comments explain the purpose and parameters without stating the obvious.
- Removed inline comments that explained what the code was doing, which is now clear from the method name and parameter naming.
- Introduced a named constant
thresholdfor clarity and maintainability.
This revised version leverages expressive names and standard naming conventions, reducing the reliance on inline comments. XML documentation comments provide valuable context, making the code self-documenting, clear, and concise, which is far more maintainable and understandable.
7. Refactor Regularly
Continuously review and refactor your code to improve its structure, readability, and maintainability.
Look for opportunities to simplify complex logic, remove duplication, and apply design patterns.
Regular refactoring is essential for maintaining the health of a codebase. It involves revisiting your code to simplify logic, eliminate redundancies, and apply design patterns where appropriate. This practice not only makes your code more readable and maintainable but also ensures it can evolve more easily to meet future requirements. Let’s dive into a practical example to illustrate the importance of regular refactoring.
Before:
public class ReportBuilder
{
public void BuildReport(List<string> data)
{
if (data != null)
{
if (data.Count > 0)
{
// Initialize report
Console.WriteLine("Report Start");
foreach (var item in data)
{
// Process and print each item
Console.WriteLine("Processing " + item);
}
// Finalize report
Console.WriteLine("Report End");
}
}
}
}
In this initial example, the method BuildReport has nested conditions checking for null and non-empty data lists. The logic for initializing, processing, and finalizing the report is all bundled into a single method, making it less readable and harder to maintain.
After:
public class ReportBuilder
{
public void BuildReport(List<string> data)
{
if (data == null || data.Count == 0) return;

InitializeReport();
ProcessDataItems(data);
FinalizeReport();
}

private void InitializeReport()
{
Console.WriteLine("Report Start");
}

private void ProcessDataItems(List<string> data)
{
foreach (var item in data)
{
Console.WriteLine($"Processing {item}");
}
}

private void FinalizeReport()
{
Console.WriteLine("Report End");
}
}
Improvements made:
- Introduced guard clause to exit early if
datais null or empty, simplifying the method’s logic flow. - Extracted the initialization, processing, and finalization steps into their own methods (
InitializeReport,ProcessDataItems, andFinalizeReport). This not only makesBuildReporteasier to read and understand but also enhances maintainability by separating concerns. - Used string interpolation for clearer, cleaner string construction.
By refactoring regularly, as demonstrated, you can significantly improve your code’s structure, making it more readable, maintainable, and adaptable to change. This proactive approach to code management saves time and effort in the long run, facilitating easier updates and enhancements.
8. Use Appropriate Data Structures and Algorithms
Choose the right data structure (e.g., list, dictionary, set) for the task at hand.
Implement efficient algorithms to optimize performance when necessary.
Choosing the correct data structure and implementing efficient algorithms are pivotal for optimizing the performance and resource utilization of your application. The right choice can drastically reduce complexity and improve execution speed. Let’s explore an example to demonstrate the significance of selecting appropriate data structures and algorithms for a given task.
Before:
Imagine we have a list of employee names and we frequently need to check if a name exists in the list. A list is used for storing the names, and linear search is applied to find names.
public class EmployeeManager
{
private List<string> employeeNames = new List<string>();

public void AddEmployee(string name)
{
employeeNames.Add(name);
}

public bool IsEmployeeExists(string name)
{
foreach (string employeeName in employeeNames)
{
if (employeeName == name) return true;
}
return false;
}
}
This approach, while straightforward, is inefficient for frequent existence checks, especially as the list grows, because each search operation has a linear time complexity ((O(n))).
After:
To optimize, we can use a HashSet<string> instead of a List<string>. A HashSet provides constant time complexity ((O(1))) for search operations on average, making it a much more efficient option for this use case.
public class EmployeeManager
{
private HashSet<string> employeeNames = new HashSet<string>();

public void AddEmployee(string name)
{
employeeNames.Add(name);
}

public bool IsEmployeeExists(string name)
{
return employeeNames.Contains(name);
}
}
Improvements made:
- Switched from
List<string>toHashSet<string>for storing employee names. This change drastically improves the efficiency of checking if an employee exists in the collection. - The
IsEmployeeExistsmethod now leveragesHashSet‘sContainsmethod, which is much faster than iterating through a list, especially as the number of employees grows.
By carefully selecting HashSet over List for this particular need, we’ve significantly optimized the performance of our employee existence check. This example underscores the importance of understanding and using the most appropriate data structures and algorithms to solve specific problems efficiently.
9. Leverage Object-Oriented Principles
Apply principles like encapsulation, inheritance, and polymorphism to create modular and extensible code.
Favor composition over inheritance when appropriate.
Applying object-oriented principles effectively can lead to code that is more modular, extensible, and easier to understand and maintain. These principles include encapsulation for hiding the internal state and requiring all interaction to be performed through an object’s methods, inheritance for creating a new class that is based on an existing class, and polymorphism to allow methods to do different things based on the object it is acting upon. Let’s also touch on the principle of favoring composition over inheritance, which encourages building classes from smaller parts (objects of other classes) rather than extending them, promoting greater flexibility.
Before:
public class Vehicle
{
public string Make;
public string Model;
public void StartEngine() { /* Implementation */ }
public void StopEngine() { /* Implementation */ }
}

public class Car : Vehicle
{
public int NumberOfSeats;
public void OpenTrunk() { /* Implementation */ }
}

public class Motorcycle : Vehicle
{
public void StartEngine() { /* Custom Implementation for Motorcycle */ }
}
This example attempts to use inheritance but does so in a way that might lead to problems down the line. For instance, Motorcycle inheriting from Vehicle might not always make sense, especially if Vehicle includes behaviors not applicable to Motorcycle.
After:
// Applying encapsulation
public class Vehicle
{
private string make;
private string model;

public Vehicle(string make, string model)
{
this.make = make;
this.model = model;
}

public virtual void StartEngine() { /* Implementation */ }
public void StopEngine() { /* Implementation */ }
}

// Favoring composition over inheritance
public class Car
{
private Vehicle vehicle;
public int NumberOfSeats { get; set; }

public Car(string make, string model, int numberOfSeats)
{
vehicle = new Vehicle(make, model);
NumberOfSeats = numberOfSeats;
}

public void StartEngine() { vehicle.StartEngine(); }
public void OpenTrunk() { /* Implementation */ }
}

public class Motorcycle
{
private Vehicle vehicle;

public Motorcycle(string make, string model)
{
vehicle = new Vehicle(make, model);
}

public void StartEngine() { /* Custom Implementation for Motorcycle */ }
}
Improvements made:
- Encapsulated
makeandmodelfields in theVehicleclass, ensuring they are modified and accessed in a controlled manner. - Introduced constructor-based dependency injection for
Vehicleproperties inCarandMotorcycle, emphasizing composition. - Made
StartEnginevirtual inVehicleto demonstrate polymorphism, allowing derived classes to provide their specific implementation. CarandMotorcycleno longer inherit fromVehiclebut instead hold aVehicleobject, demonstrating favoring composition over inheritance. This change increases modularity and avoids the complications of deep inheritance hierarchies.
By leveraging these object-oriented principles, the code becomes more flexible, easier to extend, and better encapsulated, showcasing the power of modular design and the benefits of composition over inheritance.
10. Write Unit Tests

Write unit tests to ensure your code works as expected and to facilitate refactoring.
Tests also serve as documentation for how the code should behave.
Writing unit tests is a fundamental practice in software development, ensuring that your code behaves as expected. It makes refactoring safer and acts as live documentation on how your code is supposed to work.
Here’s an example to demonstrate the transformation from code without unit tests to a version with tests, highlighting the clarity and security they provide.
Before:
Consider a simple class without any unit tests. It calculates the total cost of items, applying a discount if applicable.
public class ShoppingCart
{
public decimal CalculateTotal(IEnumerable<decimal> prices, decimal discountPercentage)
{
decimal total = prices.Sum();
if (discountPercentage > 0)
{
decimal discountAmount = total * (discountPercentage / 100);
total -= discountAmount;
}
return total;
}
}
Without unit tests, we’re in the dark about whether CalculateTotal works correctly under various scenarios, such as when discounts are applied or not.
After:
We introduce unit tests using a testing framework like NUnit or xUnit. These tests ensure our method works as expected for different inputs.
using System.Collections.Generic;
using Xunit;

public class ShoppingCartTests
{
[Fact]
public void CalculateTotal_WithoutDiscount_ReturnsSumOfPrices()
{
// Arrange
var shoppingCart = new ShoppingCart();
var prices = new List<decimal> { 10m, 20m, 30m };

// Act
var total = shoppingCart.CalculateTotal(prices, 0);

// Assert
Assert.Equal(60m, total);
}

[Fact]
public void CalculateTotal_WithDiscount_AppliesDiscountCorrectly()
{
// Arrange
var shoppingCart = new ShoppingCart();
var prices = new List<decimal> { 100m };
var discountPercentage = 10m; // 10% discount

// Act
var total = shoppingCart.CalculateTotal(prices, discountPercentage);

// Assert
Assert.Equal(90m, total);
}
}
Improvements made:
- Introduced two unit tests using xUnit:
CalculateTotal_WithoutDiscount_ReturnsSumOfPricesandCalculateTotal_WithDiscount_AppliesDiscountCorrectly. - The first test verifies that the method correctly sums prices when no discount is given.
- The second test checks if the method applies a 10% discount correctly.
By incorporating these unit tests, we now have a reliable way to verify that our CalculateTotal method functions correctly under specified conditions. Furthermore, these tests provide clear examples of how the method is intended to be used, serving both as a safeguard against regressions and as practical documentation.
11. Avoid Tight Coupling
Refactor your code to reduce dependencies and make it more testable.
Extract small, focused methods and classes that can be easily tested in isolation.
Use dependency injection to decouple components.
Avoiding tight coupling in your code is crucial for creating a flexible, maintainable, and easily testable application. Tight coupling makes it hard to modify one component without affecting others, complicates testing, and reduces the code’s adaptability to change. Let’s look at an example to illustrate the transition from tightly coupled code to a more loosely coupled architecture through refactoring, method extraction, and dependency injection.
Before:
In the tightly coupled version, components directly instantiate and use dependencies, making them hard to test in isolation or replace with different implementations.
public class OrderProcessor
{
private EmailService _emailService;

public OrderProcessor()
{
_emailService = new EmailService(); // Tight coupling
}

public void ProcessOrder(Order order)
{
// Process the order...

// Send confirmation email
_emailService.SendEmail(order.CustomerEmail, "Your order has been processed.");
}
}

public class EmailService
{
public void SendEmail(string to, string message)
{
// Send an email
}
}
After:
To reduce coupling, we can refactor the code by introducing an interface for the EmailService and using dependency injection to pass in an instance. This way, the OrderProcessor is not directly dependent on a specific implementation of the email sending functionality.
public interface IEmailService
{
void SendEmail(string to, string message);
}

public class EmailService : IEmailService
{
public void SendEmail(string to, string message)
{
// Implementation remains the same
}
}

public class OrderProcessor
{
private IEmailService _emailService;

public OrderProcessor(IEmailService emailService)
{
_emailService = emailService; // Dependency injection
}

public void ProcessOrder(Order order)
{
// Process the order logic remains the same...

// Send confirmation email
_emailService.SendEmail(order.CustomerEmail, "Your order has been processed.");
}
}
Improvements made:
- An interface
IEmailServiceis introduced, whichEmailServiceimplements. This abstraction allows for different implementations of email services to be used, enhancing flexibility. - The
OrderProcessorclass now receives anIEmailServiceinstance through its constructor, a practice known as dependency injection. This change decouples theOrderProcessorfrom theEmailService, making the former easier to test in isolation and more adaptable to changes in the email service implementation. - With these changes, testing
OrderProcessorbecomes simpler, as you can mock theIEmailServiceinterface during tests, focusing on the order processing logic without worrying about the email sending part.
By employing these techniques, we’ve transformed tightly coupled components into a more loosely coupled system, promoting modularity, testability, and adherence to the SOLID principles of object-oriented design.
12. Leverage Mocking Frameworks
Use mocking frameworks like Moq or NSubstitute to isolate dependencies and test individual components.
This allows you to test edge cases and error conditions more easily.
Leveraging mocking frameworks is a powerful strategy in unit testing that allows you to isolate the component under test. This means you can simulate various scenarios, including edge cases and error conditions, without relying on real implementations of dependencies.
Mocking frameworks like Moq or NSubstitute provide the tools to create these mock objects effortlessly. Here’s an example that demonstrates how to transition from a test setup that doesn’t use mocking to one that does, enhancing testability and focusing on testing individual components in isolation.
Before:
In our initial example, we directly instantiate a dependency within the class being tested. This setup makes it hard to isolate the component for unit testing because it depends on the real implementation of the dependency.
public class ProductService
{
private DatabaseService _databaseService = new DatabaseService();

public Product GetProductById(int id)
{
return _databaseService.QueryProductById(id);
}
}

public class DatabaseService
{
public Product QueryProductById(int id)
{
// Imagine this method queries a real database.
return new Product();
}
}
Testing ProductService.GetProductById would indirectly test DatabaseService, making the test slower and potentially unreliable due to its dependency on a real database.
After:
To improve this, we can introduce an interface for DatabaseService, use dependency injection to pass a mock implementation during testing, and apply a mocking framework to control the behavior of this dependency.
public interface IDatabaseService
{
Product QueryProductById(int id);
}

public class DatabaseService : IDatabaseService
{
public Product QueryProductById(int id)
{
// Real database query implementation.
return new Product();
}
}

public class ProductService
{
private IDatabaseService _databaseService;

public ProductService(IDatabaseService databaseService)
{
_databaseService = databaseService;
}

public Product GetProductById(int id)
{
return _databaseService.QueryProductById(id);
}
}
Now, let’s use a mocking framework (e.g., Moq) to write a unit test for ProductService without involving the real DatabaseService.
using Moq;
using Xunit;

public class ProductServiceTests
{
[Fact]
public void GetProductById_ReturnsProduct()
{
// Arrange
var mockDatabaseService = new Mock<IDatabaseService>();
mockDatabaseService.Setup(service => service.QueryProductById(1)).Returns(new Product { Id = 1 });

var productService = new ProductService(mockDatabaseService.Object);

// Act
var result = productService.GetProductById(1);

// Assert
Assert.NotNull(result);
Assert.Equal(1, result.Id);
}
}
Improvements made:
- Introduced
IDatabaseServiceto abstractDatabaseServicefunctionality, enabling the use of different implementations, including mock objects. - Modified
ProductServiceto acceptIDatabaseServicethrough its constructor, facilitating dependency injection. - Utilized Moq to create a mock
IDatabaseServicein our test, specifying behavior forQueryProductByIdmethod. This isolatesProductServicefromDatabaseService, allowing us to testProductServicein isolation and simulate various scenarios.
By employing a mocking framework and refactoring the code to use dependency injection, we’ve made our unit tests more focused, flexible, and reliable. This approach simplifies testing edge cases and error conditions, as dependencies are easily controlled and manipulated within the test environment.
13. Separate Concerns
Divide your code into smaller, more focused classes and methods with single responsibilities.
This makes the code more modular and easier to test.
Separating concerns within your code is about breaking down a software application into distinct features that overlap as little as possible. It enhances modularity, making your code easier to maintain, understand, and test. By assigning a single responsibility to each class or method, you simplify future modifications and reduce the risk of bugs when changes are made.
Let’s examine an example to illustrate how to transform a codebase with intertwined responsibilities into one where concerns are properly separated.
Before:
Here’s a class that mixes data access, business logic, and presentation concerns all together, making it hard to understand, maintain, or test any of those aspects in isolation.
public class OrderManager
{
public void ProcessOrder(string orderId, string userEmail)
{
// Query database to get order details
var orderDetails = "Details of order " + orderId; // Simplified for illustration

// Perform some business logic
var orderProcessed = "Processed " + orderId;

// Send an email to the user
Console.WriteLine("Sending email to " + userEmail + " about " + orderProcessed);
}
}
After:
To improve this, we’ll separate the concerns into different classes, each focusing on a single responsibility: data access, business logic, and presentation (in this case, user notification).
public class OrderRepository
{
public string GetOrderDetails(string orderId)
{
// Implementation to query database
return "Details of order " + orderId; // Simplified for illustration
}
}

public class OrderService
{
private OrderRepository _orderRepository = new OrderRepository();

public string ProcessOrder(string orderId)
{
var orderDetails = _orderRepository.GetOrderDetails(orderId);
// Perform business logic on orderDetails
return "Processed " + orderId;
}
}

public class UserNotificationService
{
public void NotifyUser(string userEmail, string message)
{
// Implementation to send an email
Console.WriteLine("Sending email to " + userEmail + " about " + message);
}
}

public class OrderManager
{
private OrderService _orderService = new OrderService();
private UserNotificationService _userNotificationService = new UserNotificationService();

public void ProcessOrder(string orderId, string userEmail)
{
var orderProcessed = _orderService.ProcessOrder(orderId);
_userNotificationService.NotifyUser(userEmail, orderProcessed);
}
}
Improvements made:
- OrderRepository: Handles data access, abstracting the details of data retrieval.
- OrderService: Contains the business logic, operating on data fetched from
OrderRepository. - UserNotificationService: Manages user communication, decoupling this concern from the order processing logic.
- OrderManager: Orchestrates the process, delegating responsibilities to the respective services.
By separating these concerns, each class now has a clear, singular responsibility, making the system as a whole more robust, adaptable, and testable. Changes in one area, like modifying the database schema or updating the notification mechanism, have minimal impact on other parts of the code.
This separation also enhances testability, as each component can be tested independently.
External Sources
https://killalldefects.com/2019/08/31/refactoring-c-unit-tests/
https://www.youtube.com/watch?v=o9ClnV_MKzE
FAQ
How can unit tests help with code maintenance and refactoring?
Improve Understanding of Existing Code
Writing unit tests forces developers to closely examine the code, understand its intentions and side effects, leading to improved comprehension.
Enable Safer Modifications
With unit tests covering key parts of the legacy code, developers can refactor or update sections with more confidence, ensuring they don’t accidentally break existing functionality.
Facilitate Incremental Changes
Unit tests allow developers to incrementally migrate legacy code towards newer frameworks or languages.
Document Code Behavior
Well-written unit tests often serve as a clarifying, up-to-date representation of what the code does from a user perspective.
Isolate Bugs
Unit tests help pinpoint where bugs are occurring and what is causing them.
Maintain a Regression Test Suite
A comprehensive suite of regression tests that can be run whenever changes are made helps ensure that refactoring does not break existing functionality.
Leverage Mocking and Isolation
Using mocking frameworks to isolate dependencies allows for more effective testing of individual components during refactoring.
Separate Concerns
Dividing the code into smaller, more focused classes and methods with single responsibilities makes the code more modular and easier to test.


 We use cookies to ensure that we give you the best experience on our website and show you relevant advertising. If you continue to use this site we will assume that you are happy with it. To find out more read our