

Let’s master the .NET Core MongoDB Repository Pattern for efficient API development.
The .NET Core MongoDB Repository Pattern is a tried and tested approach that allows you to separate data access logic from the rest of your application. By centralizing data operations in a well-defined repository interface, you can improve code maintainability, scalability, and testability. This pattern enables you to write clean and modular code, making your APIs more robust and efficient.
Understanding the Repository Pattern
Before diving into the specifics of the .NET Core MongoDB Repository Pattern, it is important to have a clear understanding of what the Repository Pattern is and how it can benefit your API development.
The Repository Pattern is a design pattern that provides an abstraction layer between the data access logic and the business logic of an application. It allows for a structured and organized approach to handling data, making it easier to manage and maintain.
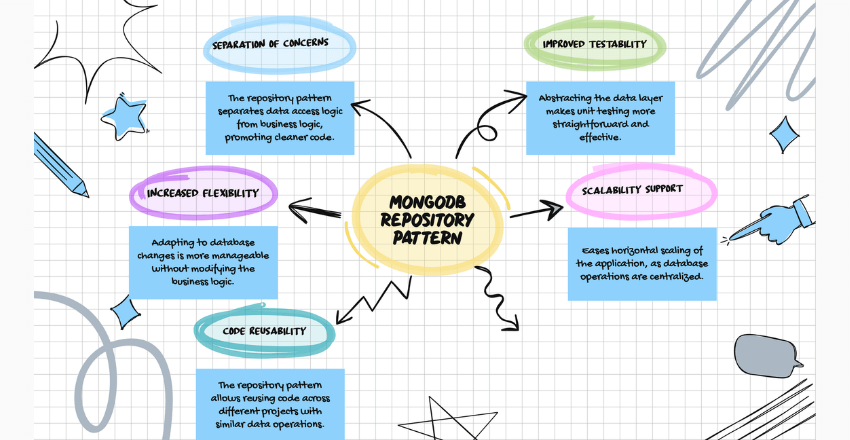
The Repository Pattern operates on the principle of separation of concerns, ensuring that each component of the application has a specific responsibility. With the Repository Pattern, the data access logic is encapsulated within the repository, while the business logic operates independently.
The Repository Pattern offers several benefits for API development:
- Modularity: The Repository Pattern allows for the segregation of data access logic, making it easier to modify or replace components without affecting the overall system.
- Testability: By separating the data access logic from the business logic, it becomes easier to write unit tests for each component, ensuring the correctness and reliability of the system.
- Flexibility: The Repository Pattern allows for the use of different data storage technologies without impacting the application code. This provides flexibility in choosing the most suitable data storage solution for your specific needs.
Overall, the Repository Pattern simplifies the development process, enhances maintainability, and improves the overall structure of an API. By understanding its core concepts and advantages, you are well-equipped to leverage the power of the Repository Pattern in your .NET Core MongoDB API development.

Introduction to .NET Core
In order to successfully implement the MongoDB Repository Pattern, it is essential to have a solid understanding of .NET Core. This section will provide you with a comprehensive introduction to .NET Core, highlighting its key features and advantages for API development.
First and foremost, let’s explore what .NET Core is. .NET Core is a cross-platform, open-source framework that allows developers to build high-performance, scalable applications. It offers a wide range of powerful tools and libraries, making it a popular choice for API development.
Key Features of .NET Core
.NET Core comes with a multitude of features that make it an excellent choice for developing APIs. Here are some key features:
- Cross-platform: .NET Core provides the flexibility to develop applications that can run on different operating systems, such as Windows, macOS, and Linux.
- High Performance: With its just-in-time compilation and optimized runtime, .NET Core delivers impressive performance, ensuring speedy and efficient API operations.
- Modular Architecture: .NET Core follows a modular design, allowing developers to easily add or remove components as needed. This promotes better code organization and maintainability.
- Dependency Injection: .NET Core has built-in support for dependency injection, which simplifies the management of object dependencies and enhances the testability and reusability of your code.
Setup and Requirements
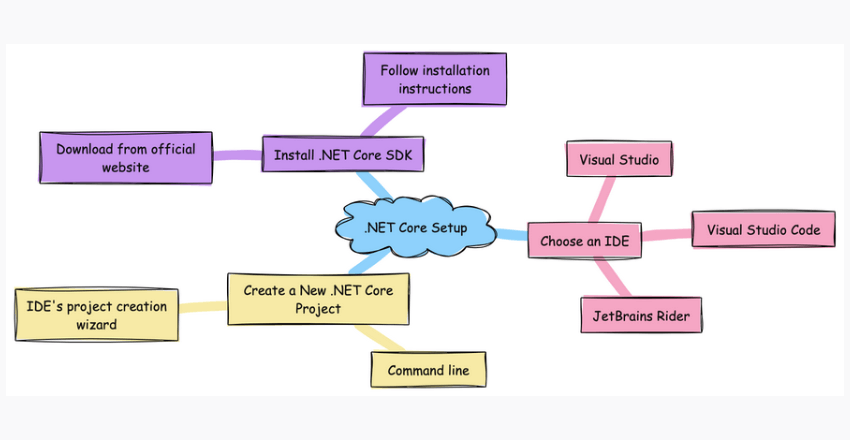
To start working with .NET Core, you need to set up your development environment. The setup process may vary depending on your operating system. Here are the general steps:
- Install the .NET Core SDK: Visit the official .NET Core website and download the SDK for your operating system. Follow the installation instructions provided.
- Choose an Integrated Development Environment (IDE): There are several popular IDE options for .NET Core development, such as Visual Studio, Visual Studio Code, and JetBrains Rider. Choose the one that suits your preferences and install it.
- Create a New .NET Core Project: Once you have set up your development environment and chosen an IDE, you can create a new .NET Core project. This can be done through the command line or using the IDE’s project creation wizard.
With the setup complete, you are now ready to dive deeper into the world of .NET Core and leverage its capabilities to implement the MongoDB Repository Pattern in your API development.
Getting Started with MongoDB
MongoDB is a popular NoSQL database that seamlessly integrates with .NET Core. Its flexible data model and robust querying capabilities make it a compelling choice for API development.
Data Model
MongoDB follows a document-oriented data model, where data is stored in JSON-like documents. These documents are schema-less, allowing for flexible data representation and easy scalability. Each document can have a different structure, enabling the storage of diverse data types within the same collection.
For example, consider a collection called “users.” Each document in the collection can have different attributes based on the user’s information, such as the user’s name, email address, and age. The lack of a fixed schema provides the flexibility to accommodate evolving data requirements.
Querying Capabilities
MongoDB offers a powerful query language that allows for flexible and efficient data retrieval. The query language supports various operators, including comparison operators, logical operators, and array operators, enabling complex queries to be constructed easily.
db.users.find({ age: { $gte: 18 } })The above query retrieves all users from the “users” collection who are 18 years or older. The simplicity and expressiveness of MongoDB’s query language make it well-suited for API development, where data retrieval is a common operation.
Connecting to a MongoDB Database
To interact with a MongoDB database in .NET Core, we need to use the MongoDB C#/.NET Core driver. This driver provides a high-level API for performing CRUD operations and executing advanced queries against the database.
To connect to a MongoDB database, we need to specify the connection string, which includes the database server address and any necessary authentication information, such as the username and password. Once connected, we can access and manipulate the data using the driver’s API.
Here’s an example of connecting to a MongoDB database in .NET Core:
var client = new MongoClient("mongodb://localhost:27017");

var database = client.GetDatabase("mydatabase");
In this example, we create a new instance of the MongoClient class and specify the connection string with the appropriate server address and port. We then retrieve the desired database using the GetDatabase method.
| Command | Description |
|---|---|
| var client = new MongoClient(connectionString); | Creates a new MongoClient instance with the specified connection string. |
| var database = client.GetDatabase(databaseName); | Retrieves the specified database from the connected MongoDB server. |
Now that we have connected to the MongoDB database, we can begin working with collections, executing queries, and manipulating data using the MongoDB C#/.NET Core driver.
Designing the Repository Interface
When implementing the MongoDB Repository Pattern, the design of the repository interface plays a pivotal role. A well-designed interface ensures that data access operations are efficiently abstracted, providing a clear separation between the business logic and the underlying data layer.
Key Considerations for Repository Interface Design
Before delving into the implementation process, it is essential to understand the key considerations that shape the design of the repository interface:
- Single Responsibility Principle (SRP): The repository interface should have a focused purpose, adhering to the SRP. It should be responsible solely for defining the contract for data access operations related to a specific entity or aggregate root.
- Abstraction of Data Operations: The repository interface should abstract the details of the underlying data operations, such as querying, updating, and deleting records. It should provide a clear and concise API for interacting with the data layer, hiding implementation details from the consumer.
- Granularity: The level of granularity in the repository interface design should strike a balance between reusability and specificity. It should be granular enough to handle the specific needs of a given entity or aggregate root, while avoiding unnecessary complexity and duplication of code.
- Domain-Driven Design (DDD) Approach: Following the principles of DDD, the repository interface should align with the domain model and business requirements. It should reflect the language and concepts of the domain, providing a seamless integration between the business logic and the data access layer.
Best Practices for Repository Interface Design
To ensure a robust and maintainable repository interface, consider the following best practices:
- Interface Segregation Principle (ISP): Apply the ISP to break down the repository interface into smaller, focused interfaces. This enables easy composition and promotes flexibility in selecting only the required contracts for different use cases.
- Use of Generic Types: Utilize generic types to create reusable repository interfaces that can cater to various entities. This helps in minimizing duplication of code and provides a consistent API across different entity types.
- Consistent Naming Conventions: Follow a consistent naming convention for the methods defined in the repository interface. This enhances readability and maintainability, making it easier for other developers to understand the purpose of each method.
- Documentation and Comments: Document the rationale behind each method in the repository interface, along with any constraints or considerations. This helps in providing clarity to other developers and fosters a better understanding of the intended usage.
Example Repository Interface
Let’s take a look at an example repository interface for managing a “Product” entity:
public interface IProductRepository {
Task<Product> GetByIdAsync(string id);
Task<IEnumerable<Product>> GetAllAsync();
Task CreateAsync(Product product);
Task UpdateAsync(Product product);
Task DeleteAsync(string id); }
In the above example, the repository interface defines methods for retrieving products by ID, retrieving all products, creating a new product, updating an existing product, and deleting a product. Notice how the interface adheres to the principles and best practices discussed earlier, providing a clear and concise contract for interacting with the “Product” entity.
Implementing the MongoDB Repository
1. Define the Generic Repository Interface
First, define an interface that contains the basic CRUD operations. This interface uses a generic type parameter, allowing it to work with any entity class.
public interface IMongoRepository<T> where T : class
{
Task<List<T>> GetAllAsync();
Task<T> GetByIdAsync(string id);
Task AddAsync(T entity);
Task UpdateAsync(string id, T entity);
Task DeleteAsync(string id);
}
2. Implement the Generic Repository
Implement the generic repository interface. This class will use MongoDB’s IMongoCollection<T> to interact with the database. It will work with any entity type that is part of the MongoDB database.
using MongoDB.Bson;
using MongoDB.Driver;
using System.Collections.Generic;
using System.Threading.Tasks;

public class MongoRepository<T> : IMongoRepository<T> where T : class
{
private readonly IMongoCollection<T> _collection;

public MongoRepository(IMongoDatabase database, string collectionName)
{
_collection = database.GetCollection<T>(collectionName);
}

public async Task<List<T>> GetAllAsync()
{
return await _collection.Find(new BsonDocument()).ToListAsync();
}

public async Task<T> GetByIdAsync(string id)
{
return await _collection.Find(Builders<T>.Filter.Eq("_id", new ObjectId(id))).FirstOrDefaultAsync();
}

public async Task AddAsync(T entity)
{
await _collection.InsertOneAsync(entity);
}

public async Task UpdateAsync(string id, T entity)
{
await _collection.ReplaceOneAsync(Builders<T>.Filter.Eq("_id", new ObjectId(id)), entity);
}

public async Task DeleteAsync(string id)
{
await _collection.DeleteOneAsync(Builders<T>.Filter.Eq("_id", new ObjectId(id)));
}
}
3. Configure MongoDB and Register the Generic Repository
In your Startup.cs file, configure MongoDB and register the generic repository with the dependency injection container. Ensure your MongoDB settings are properly configured in your appsettings.json or another configuration source.
a. Add MongoDB settings in appsettings.json:
{
"MongoDbSettings": {
"ConnectionString": "your_mongodb_connection_string",
"DatabaseName": "your_database_name"
}
}
b. Configure and register in Startup.cs:
public void ConfigureServices(IServiceCollection services)
{
// MongoDB configuration
var mongoDbSettings = Configuration.GetSection("MongoDbSettings").Get<MongoDbSettings>();
var client = new MongoClient(mongoDbSettings.ConnectionString);
var database = client.GetDatabase(mongoDbSettings.DatabaseName);

// Register the MongoDB context or direct collections
services.AddSingleton<IMongoDatabase>(database);

// Register the generic repository for dependency injection
services.AddScoped(typeof(IMongoRepository<>), typeof(MongoRepository<>));
}
4. Use the Generic Repository in Your Application
You can now inject and use the generic repository in your controllers or services. Here’s an example with a hypothetical Product entity:
public class ProductsController : Controller
{
private readonly IMongoRepository<Product> _productRepository;

public ProductsController(IMongoRepository<Product> productRepository)
{
_productRepository = productRepository;
}

public async Task<IActionResult> Index()
{
var products = await _productRepository.GetAllAsync();
return View(products);
}

// Implement other actions (Create, Edit, Delete) here
}
This setup demonstrates a clean way to implement a generic repository pattern with MongoDB in a .NET Core application, facilitating a more structured and maintainable codebase.
Benefits of Implementing the Repository Pattern with MongoDB
Implementing the repository pattern with MongoDB in a .NET Core application offers several benefits for maintainability:
Abstraction: The repository pattern abstracts the data access logic from the business logic, making the codebase cleaner and easier to manage. This separation of concerns allows developers to focus on business rules without worrying about data access details.
Testability: By abstracting the data access logic, the repository pattern makes it easier to write unit tests. Mocking the repository interfaces allows for testing business logic without needing a live database connection.
Consistency: Using a generic repository pattern ensures a consistent approach to data access across the application. This consistency reduces the likelihood of errors and makes it easier to maintain and extend the application.
Challenges and Considerations
While the repository pattern offers many benefits, there are specific challenges and considerations when working with MongoDB in a .NET Core application:
Document Schema Changes: MongoDB’s flexible schema can lead to challenges when the document structure changes. The repository pattern may need to accommodate these changes, which can complicate the abstraction.
Performance: Abstracting MongoDB-specific features can sometimes lead to performance issues. For example, MongoDB provides powerful querying capabilities that might be underutilized if the repository pattern is too generic.
Indexing: Defining indexes in a generic repository can be challenging. Indexes are crucial for performance, but they are often specific to the collection and query patterns.
Simplifying Data Access Logic with Generic Interfaces
Utilizing generic interfaces in the repository pattern simplifies data access logic by providing a common set of operations for all entities.
Here’s an example:
Generic Repository Interface
public interface IMongoRepository<T> where T : class
{
Task<List<T>> GetAllAsync();
Task<T> GetByIdAsync(string id);
Task AddAsync(T entity);
Task UpdateAsync(string id, T entity);
Task DeleteAsync(string id);
}
Implementation
using MongoDB.Bson;
using MongoDB.Driver;
using System.Collections.Generic;
using System.Threading.Tasks;

public class MongoRepository<T> : IMongoRepository<T> where T : class
{
private readonly IMongoCollection<T> _collection;

public MongoRepository(IMongoDatabase database, string collectionName)
{
_collection = database.GetCollection<T>(collectionName);
}

public async Task<List<T>> GetAllAsync()
{
return await _collection.Find(new BsonDocument()).ToListAsync();
}

public async Task<T> GetByIdAsync(string id)
{
return await _collection.Find(Builders<T>.Filter.Eq("_id", new ObjectId(id))).FirstOrDefaultAsync();
}

public async Task AddAsync(T entity)
{
await _collection.InsertOneAsync(entity);
}

public async Task UpdateAsync(string id, T entity)
{
await _collection.ReplaceOneAsync(Builders<T>.Filter.Eq("_id", new ObjectId(id)), entity);
}

public async Task DeleteAsync(string id)
{
await _collection.DeleteOneAsync(Builders<T>.Filter.Eq("_id", new ObjectId(id)));
}
}
This approach allows you to use the same repository interface and implementation for different entities, reducing code duplication and simplifying data access logic.
Best Practices for Structuring a .NET Core Application
When using the repository pattern with MongoDB in a .NET Core application, consider the following best practices:
Separation of Concerns: Keep the data access layer separate from the business logic layer. Use services to encapsulate business logic and inject repositories into these services.
Dependency Injection: Register the repository and MongoDB context with the dependency injection container in
Startup.cs. This ensures that dependencies are managed centrally and can be easily swapped out if needed.Configuration Management: Store MongoDB connection strings and database names in configuration files (e.g.,
appsettings.json). Use strongly-typed configuration classes to access these settings.Error Handling: Implement robust error handling in the repository methods. Consider using logging to capture and diagnose issues that occur during data access operations .
Testing and Debugging the MongoDB Repository Pattern
Testing and debugging the MongoDB repository pattern in a .NET Core application involves several steps to ensure that your data access logic is correct and efficient. Here are some strategies and best practices to help you test and debug effectively:
Unit Testing the MongoDB Repository
Unit testing the repository pattern involves mocking the MongoDB context and collections to isolate the repository logic from the actual database. This allows you to test the repository methods without requiring a live MongoDB instance.
1. Setting Up the Test Environment
Use a mocking framework like Moq to create mock objects for the MongoDB context and collections.
using Moq;
using MongoDB.Driver;
using Xunit;

public class MongoRepositoryTests
{
private readonly Mock<IMongoCollection<MyEntity>> _mockCollection;
private readonly Mock<IMongoDatabase> _mockDatabase;
private readonly Mock<IMongoClient> _mockClient;
private readonly MongoRepository<MyEntity> _repository;

public MongoRepositoryTests()
{
_mockCollection = new Mock<IMongoCollection<MyEntity>>();
_mockDatabase = new Mock<IMongoDatabase>();
_mockClient = new Mock<IMongoClient>();

_mockDatabase.Setup(db => db.GetCollection<MyEntity>(It.IsAny<string>(), null))
.Returns(_mockCollection.Object);

_mockClient.Setup(client => client.GetDatabase(It.IsAny<string>(), null))
.Returns(_mockDatabase.Object);

_repository = new MongoRepository<MyEntity>(_mockDatabase.Object, "MyEntities");
}

// Add test methods here
}
2. Writing Unit Tests
Write unit tests for each repository method. Use the mock objects to simulate database operations.
public class MongoRepositoryTests
{
// ... (setup code)

[Fact]
public async Task GetAllAsync_ShouldReturnAllEntities()
{
// Arrange
var entities = new List<MyEntity> { new MyEntity { Id = "1" }, new MyEntity { Id = "2" } };
var mockCursor = new Mock<IAsyncCursor<MyEntity>>();
mockCursor.Setup(_ => _.Current).Returns(entities);
mockCursor.SetupSequence(_ => _.MoveNext(It.IsAny<CancellationToken>())).Returns(true).Returns(false);

_mockCollection.Setup(collection => collection.FindAsync(It.IsAny<FilterDefinition<MyEntity>>(), null, default))
.ReturnsAsync(mockCursor.Object);

// Act
var result = await _repository.GetAllAsync();

// Assert
Assert.Equal(entities.Count, result.Count);
}

// Add more tests for other methods
}
Integration Testing with Embedded MongoDB
Integration tests involve testing the repository with a real MongoDB instance. Using an embedded MongoDB instance can simplify this process.
1. Setting Up Embedded MongoDB
Use Flapdoodle’s embedded MongoDB solution to run MongoDB integration tests smoothly.
using Mongo2Go;
using Xunit;

public class MongoRepositoryIntegrationTests : IDisposable
{
private readonly MongoDbRunner _runner;
private readonly IMongoDatabase _database;
private readonly MongoRepository<MyEntity> _repository;

public MongoRepositoryIntegrationTests()
{
_runner = MongoDbRunner.Start();
var client = new MongoClient(_runner.ConnectionString);
_database = client.GetDatabase("IntegrationTests");
_repository = new MongoRepository<MyEntity>(_database, "MyEntities");
}

public void Dispose()
{
_runner.Dispose();
}

// Add integration test methods here
}
2. Writing Integration Tests
Write integration tests to verify that the repository interacts correctly with the MongoDB instance.
public class MongoRepositoryIntegrationTests : IDisposable
{
// ... (setup code)

[Fact]
public async Task AddAsync_ShouldInsertEntity()
{
// Arrange
var entity = new MyEntity { Id = "1", Name = "Test Entity" };

// Act
await _repository.AddAsync(entity);
var result = await _repository.GetByIdAsync("1");

// Assert
Assert.NotNull(result);
Assert.Equal(entity.Name, result.Name);
}

// Add more integration tests for other methods
}
Debugging Tips
- Logging: Implement logging in your repository methods to capture detailed information about the operations being performed. This can help you diagnose issues more effectively.
- Breakpoints: Use breakpoints in your IDE to step through the repository methods and inspect the state of variables and objects.
- Exception Handling: Ensure that your repository methods have robust exception handling to catch and log any errors that occur during database operations.
- Mocking Complex Scenarios: When unit testing, mock complex scenarios such as network failures or database timeouts to ensure that your repository handles these situations gracefully.
Best Practices
- Separation of Concerns: Keep your unit tests focused on the repository logic and use integration tests to verify the interaction with the database.
- Test Coverage: Ensure that you have comprehensive test coverage for all repository methods, including edge cases and error conditions.
- Continuous Integration: Integrate your tests into a continuous integration pipeline to automatically run them on each commit and catch issues early.


 We use cookies to ensure that we give you the best experience on our website and show you relevant advertising. If you continue to use this site we will assume that you are happy with it. To find out more read our